
Acquisition of ECG signals using biomedical systems
STEP 1: Patient, Electrode and ECG Machine Placement
- Drag the patient model from the component section and position it onto the bed.
- Drag each electrode and place it securely on the designated areas of the patient's body.
- Drag the ECG machine and place it onto the provided stand.
STEP 2:
Select Lead from the dropdown Select Lead to view the corresponding signal.
Electrode Connection Required for Correct Lead Viewing
leadII: RA, LL, RL
leadIII: LA, LL, RL
aVR: RA, LA, LL, RL
aVL: LA, RA, LL, RL
aVF: LL, RA, LA, RL
V1: V1, RA, LA, LL, RL
V2: V2, RA, LA, LL, RL
V3: V3, RA, LA, LL, RL
V4: V4, RA, LA, LL, RL
V5: V5, RA, LA, LL, RL
V6: V6, RA, LA, LL, RL
allLead: RA, LA, LL, RL, V1, V2, V3, V4, V5, V6
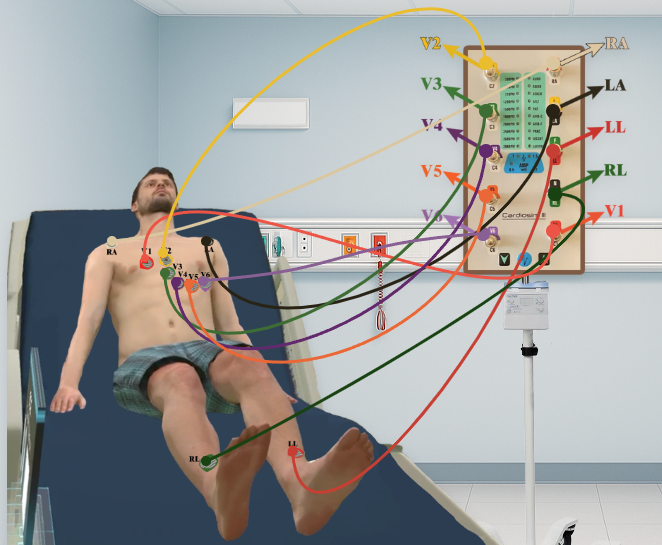
STEP 3: Establish Connections
1. Connect V-leads:
- Connect the V1 lead from the ECG machine to the V1 electrode on the patient's body.
- Connect the V2 lead from the ECG machine to the V2 electrode on the patient's body.
- Connect the V3 lead from the ECG machine to the V3 electrode on the patient's body.
- Connect the V4 lead from the ECG machine to the V4 electrode on the patient's body.
- Connect the V5 lead from the ECG machine to the V5 electrode on the patient's body.
- Connect the V6 lead from the ECG machine to the V6 electrode on the patient's body.
2. Connect Limb Leads:
- Connect the RA (Right Arm) lead from the ECG machine to the RA electrode on the patient's body.
- Connect the LA (Left Arm) lead from the ECG machine to the LA electrode on the patient's body.
- Connect the RL (Right Leg) lead from the ECG machine to the RL electrode on the patient's body.
- Connect the LL (Left Leg) lead from the ECG machine to the LL electrode on the patient's body.
Refer to the accompanying figure for correct connection points.
STEP 4:
Click the Check button to confirm the integrity of the established connections.
STEP 5:
If the connection check indicates an error, click the Reset button to clear all the connections and restart the process.
STEP 6:
Click the Show Signal button to display the simulated ECG waveform.
STEP 7:
Use the Toggle Sound button to enable or disable auditory feedback.
STEP 8:
Use the Pause Signal button to pause or resume the displayed ECG waveform.
STEP 9:
Click the Print button to save the recorded observations.